Well, we had stomach flu at our house, so I wasn't at garden class this week. But apparently they made yummy greens and potatoes, and I'll try to get the recipe as soon as I can...
Thursday, March 8, 2012

Thursday, March 1, 2012
Rain, Rain, Come and Stay
Neither rain nor sleet nor snow… okay, well, we don’t really have those last two around
here. But we certainly aren’t
letting a little rain stop us from having garden class this week. Especially since we’ve had so little
rain this year, so all of our “rainy day” curricula are languishing in the
filing cabinet. Hurrah for the
rain!


Number one on our rain list: watersheds. I grew up near a creek, the flow of
water toward which was so easy to see in the acres of open farmland. I didn’t know the word watershed and
didn’t really need to, having an intuitive understanding of the process of
water flowing toward the sea.
But these kids mostly live where there are lots of houses,
and it’s not always clear where the water in the drainage ditch beside the
driveway is heading. To the
neighbors, right?
So watersheds is our main rainy day theme, and it starts
with the big picture. Big trays of
clay that the kids mold into pathways by which precipitation flows toward the
wetland (a sponge) and then the ocean.
Hands-on learning, indeed.


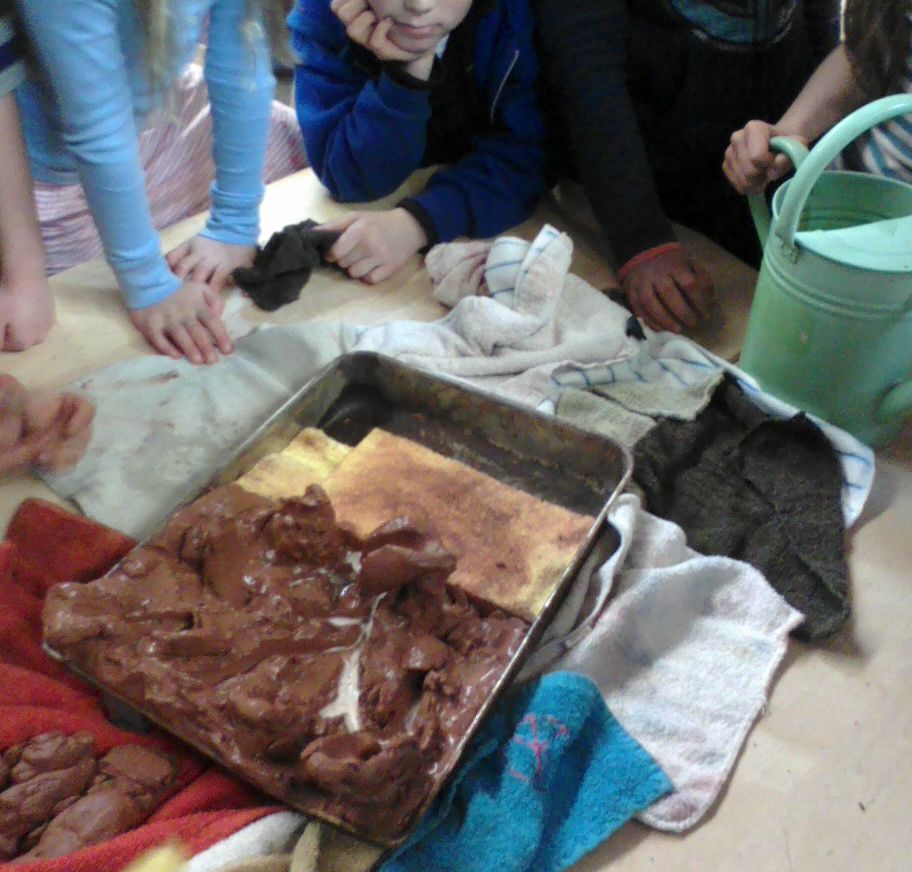
(No cooking today—our kitchen is wet wet wet.)
Friday, February 24, 2012
special president's week edition
There's no school, so presumably we are all home reading. At our house, we are actually, for once, honoring the Presidents' Holiday by reading this brilliant book:

Buy it from your local independent bookseller and enjoy forever. Pay no heed to the misconception that your kids are "too old" for picture books. This one has the Gettysburg Address on the endpapers. Maira Kalman, who can do no wrong, loves Lincoln and she will make you love him too. Hurrah for her!
Saturday, February 18, 2012
Free-for-all
The faithful readers may have noticed that so far, February has been, well… a little difficult. The kids were pushing at the boundaries, hard. So at the beginning of this week’s class, with the children all lined up on benches waiting for their assignments, I was fully expecting T to give a stern lecture on, oh, you know, Respect and Following Directions and so on.
Nope.
Instead, she asked them to choose their activity. “Who wants to build raised beds? Who wants to cook?” Whaaa? She’s letting them pick? Surely, chaos and pandemonium will ensue!
The potential chefs warily ask, “What are we cooking?” to which T responds breezily, “Whatever you want!” and sends the two who want to cook trotting off toward me, the assigned kitchen helper of the day, who had in fact been told that we were making sautéed greens.
Well, okay then, um, kid choice. I did have to clarify a bit: “We can make whatever you want within the parameters of what ingredients are available. And what’s ready for harvest is mostly kale.”
These kids, though, they are incredible! They harvested a HUGE mess of kale, found a leek and some garlic in the garden, and went to town. They also wanted biscuits, and there happened to be a big bag of Pamela’s gluten-free baking mix in the fridge, so they whipped out a big batch of gluten-free drop biscuits in time for the box-builders to have a fabulous after work snack.
The afternoon group, five cooks in all, decided that greens were off the menu, so they made pizza, or, well, they made the closest thing to pizza we could do given our aforementioned parameters.
And guess what? They were angels. Given some space, some latitude, and an opportunity to invent, they also self-regulated, which worked out far better than our attempts to regulate them usually do. Ahhh, freedom.
So, kid-inventions below.
(Plus, the other groups built some rocking redwood garden beds!)

Super-delicious greens
Harvest a big bunch of kale. Then harvest double that amount, while explaining to the kids how greens cook down much smaller than their original size.
Harvest, wash and chop one leek, sauté in olive oil.
While waiting for leek to cook, chop up a small head of slightly green heirloom red garlic (sooo yum), then add that into the pan.
While all that was going on, someone was washing and chopping up the kale. Add as much as you can fit (about half) into the pan until the pan is heaped high, then watch it cook down. Add some Bragg’s Amino Acids and dump it into a bowl.
Decide that before you cook the rest of the greens you will roast up some pumpkin seeds in your pan so throw those in. When they seem toasty, add a bit more oil and the rest of the kale, sauté until bright green and soft. Add more Bragg’s if you want.
Combine the two batches and chow down. Very excellent served with gluten-free drop biscuits.
Garlic flatbread (the foodstuff formerly known as pizza)
Harvest some red garlic. Get a bit carried away, and harvest a lot.
Wash, peel and chop small, sauté.
Meanwhile, set up two bowls for dough. Let the kids figure out what they want in their dough (okay to give hints). Bowl #1 used one egg, gluten-free baking mix, and some water. Bowl #2 used wheat flour, an egg, some baking powder (no yeast on hand), and salt. They each mixed and kneaded and flattened out the dough on a cookie sheet as best they could.
Spread oil and sautéed garlic all over the dough, cook at 450 or so until brown on edges (gluten-free cooks faster, fyi), about 10ish minutes.
While baking explain psychology of naming food to kids: if they tell their classmates they are serving "pizza," the kids will be expecting tomato sauce and cheese. If they say "garlic bread," they will be expecting sliced bread with butter. "Garlic flatbread," consensus reached by the time the food was ready. And the kids all loved it!
Saturday, February 11, 2012
stick-to-it-ness
This week, by noon, we were ready to throw in the kitchen
dishtowel. The kids had been great
while on-task, but when they sat down to eat their bowls of pasta and hear a
story about--you guessed it!--reverence,
in preparation for next week’s tree-planting ceremony… Well, let’s just say that “reverence”
was not the theme of the day. The
theme of the day was more stick-with-it-even-when-you-feel-entirely-discouraged-and-sure-whatever-it-it-you-are-doing-will-never-work.
Midway through the morning class, when T walked past the
kitchen with her group of tired raised-bed carpenters, she asked how the
pasta-making was going.

“Yes, now,” I added.
“But it did require a certain amount of stick-to-it-ness.” (Refer to the recipe below!)
Fortunately, the kids’ pre-irreverent modeling of that
stick-to-it-ness was just the lesson that I needed to help me not flee in
terror before the afternoon group came.
The morning group is usually the Calm Group. Yikes.
But we stayed, and they came, and for my group I laid out
the boundaries of expected behavior clearly. (Something like: “I have NO
patience today for people not listening.
I have lots of nice but no patience left, so you’re either in garden
class or out, and out means the office.”)
And amazingly, that’s all they needed: an adult with no patience
left. We started to measure out
the flour, and we each stuck to our job even through the sticky bits, and we
all had plenty of nice (even though it seemed unlikely), and plenty of pasta
(even though it seemed like it would never work), and plenty of fun (well, of
course).

a.k.a. the easiest recipe in the world (to remember, not to
make)
1 cup flour
1 egg
Some warm water if it won’t stick together.
Quadruple it to feed ten kids plus helpers (that’s two bowls
each with a doubled recipe).
Oh, plus we added some garlic powder just for fun. Let’s describe it as a “dash.”
Mix flour with garlic powder and make a hole in the middle
of the flour to crack the eggs in: one egg per two hands. Beat eggs with a fork and then mix into
flour. We needed a few tablespoons
of warm water to get our dough to stick (probably depends a lot on your flour
and the size of the eggs).
Be careful not to make it too sticky as you have to run it
through the pasta machine.

Theoretically, the dough will emerge as a long strip of
flattened dough. In practice, it
might come out of the machine as a bunch of sloppy dough shreds. This will seriously challenge the faith
that the group previously had in the machine, themselves, and their adult
helper.
Try again! More
shreds. Cheerlead a bit,
hopefully. Press the shreds into a
something resembling a messy slab and try again. Woohoo! Bigger,
flatter shreds! We can do it! Keep going. Flatten, crank, repeat. Eventually, if you believe, and stick to it (not to the
machine, that would be overly disheartening), you will in fact have a long thin
strip of dough. Which you can fold
in half and keep running through the machine as you adjust the rollers to be
closer and closer together.
This roll, fold, repeat maneuver is not in the printed
instructions, but if you happen to have watched your friend the professional
chef make pasta with this own kids one night, you will recall that he did this
so it seems like probably a good idea.
Miraculously, the sheets eventually turn shiny and beautiful
and you can move the crank handle over to the noodle-cutting part of the
machine, and crank the sheet through to the delight of the owners of the eight
hard-working hands!

 (Confession: we used jar tomato sauce. But we also harvested kale and sautéed
it to eat with the pasta. With
grated parmesan for all.)
(Confession: we used jar tomato sauce. But we also harvested kale and sautéed
it to eat with the pasta. With
grated parmesan for all.) |
| YUM!! |
Friday, February 3, 2012
C is for Cabbage, and Cold, and Coleslaw, and Compromise
It’s cold season, so T started off the class with a brief
talk about Vitamin C, where you find it, and how it works. Her theater training really pays off
when it comes to engaging the kids’ attention: they were transfixed by her
impersonation of the immune system.
Then we set off for the garden with a plan: food with high C-content
today!
This week I was off remixing a barrel of dirt with my group
(that’s a process of digging, dumping, blending nutrients--compost!--into the
soil, and refilling) and planting peas, greens, and flowers, so when we headed
in to wash up and eat the coleslaw that the cooking group had made, I asked the
kitchen helper mom if she followed the recipe as written that I found lying
beside the chopping boards.
“Yes, I followed it exactly,” she said.
“Wow. That
never happens,” I murmured as I copied it down to post. Word for word, starting to wonder if I
needed to credit the source. I
don’t usually since our normal garden kitchen procedure is to mangle the
starting recipe far beyond recognition before we are done.
“Oh, except, I didn’t do the thing with the apples,” she
remembered, after I carefully wrote out the too-many steps to prevent apple
browning. “I just put them in
last.”
“Okay, cool.”
We serve ourselves big bowls of the immune-supporting slaw.
“Hey, there are carrots in here. That wasn’t in the recipe.”
“Well, they were on the table, so we used them.”
“Of course. And
I’m noticing a bottle here that appears to have once contained agave syrup.”
“Oh, yeah. We
used that too.”
Recipe, take two.
Source: what’s on the table, with a few tips from an old CSA newsletter
from Taylor Maid Farm.

Cold-season Coleslaw
1 red cabbage, hacked to bits
1 green cabbage, similarly prepped
However many carrots are in a bunch, grated
A panful of roasted walnut pieces
Some crispy apples, grated at the last minute
2 Tbsp apple cider vinegar
Lemon juice from one lemon
Sea salt
Fresh ground pepper
1/2 cup olive oil
However much agave syrup remains in a mostly used-up bottle
A
splash of heavy cream (if you’ve got vegans)(Come to think of it, with that much cabbage they probably doubled the dressing recipe as it was originally written for a single-cabbage slaw.)
Whisk vinegar, lemon juice, salt & pepper together, then whisk in olive oil. Then agave and cream. Toss with cabbage, carrots, walnuts and apples. Serve.
Friday, January 27, 2012
How to harvest broccoli
Okay, truth is, this week they were all Wild Child and Wild Child was so wild that I am
still recovering and have zero energy for blogging. But I probably don’t need to say what happened in garden
class to the rest of you third grade parents since you are the ones at home
scrubbing out the mud-soaked clothes and silt-swamped shoes…


Unless your kids was in this group of kids who managed to
move a bunch of compost without getting drenched:

But, in brief, here goes.
You know, this is just one of those things that I so hate to admit I didn’t know before I went to third
grade garden class. But I
didn’t. I never knew the correct
way to harvest broccoli. Not that
I’ve ever had much to harvest beyond a few little florets. But still. I hope someday to need to know how to harvest broccoli. And now I do. (You cut it diagonally below the florets you want to eat but
above healthy leaves so the stalk can send out some new florets.)
Broccoli with lemon butter

Make a pot of brown rice.
Harvest and cut up broccoli (florets and stems), steam.
Melt some fake butter (for the non-dairy types); squeeze out
a lemon; mix “butter” and juice.
Mix broccoli, lemon butter, a big handful of sesame seeds,
and some Bragg’s Amino Acids (Extra squirts for the kids who like it
salty). Serve over the rice. Yum.
Subscribe to:
Posts (Atom)